

ConfirmTransfer lets your customers pay by bank transfer and submit payment proof during StoreBounty checkout. Your team then checks the payment before confirming it. This guide covers the receiving bank account, the checkout switch and the optional opening-hours controls, with screenshots of the actual setup screens.
Before You Start: A Quick Checklist
Run through these points before opening any settings page. Ticking them off now prevents the most common setup problems.
You have your receiving bank account details to hand. You will need the bank name and account number. The account name is populated automatically after verification on Nigerian stores.
You have dashboard access. You need permission to edit Settings and Online Checkout pages.
You have decided whether to restrict ConfirmTransfer to your opening hours. If yes, know your weekly schedule before you start — you will enter it day by day.
You know your store's local timezone. Nigerian stores should use Africa/Lagos (West Africa Time). Stores in other countries should confirm their own timezone before saving.
Your team understands that uploaded proof is not a payment confirmation. Someone on your team will need to check your actual bank statement before marking any order as paid.
Step 1 — Add Your Receiving Bank Account
ConfirmTransfer needs to know which bank account your customers should pay into. Without a saved account, the transfer option will not be available at checkout, so this is the very first thing to set up.
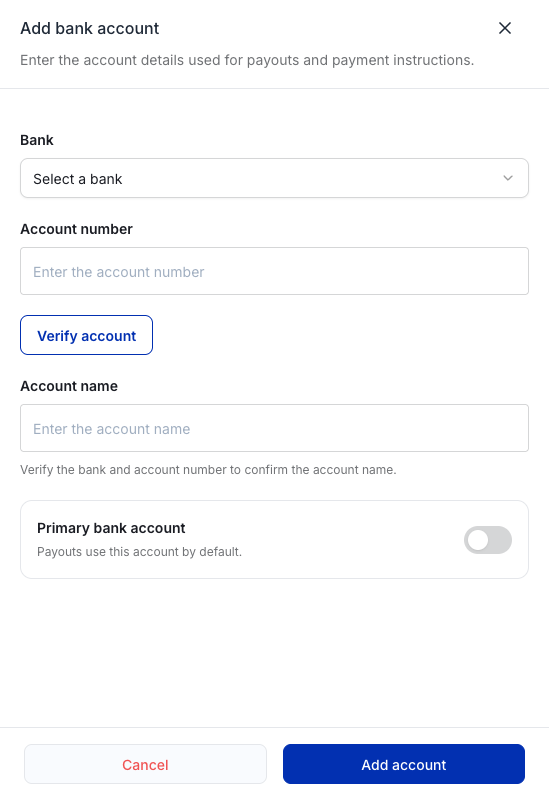
Navigate to Settings > Bank Accounts in your StoreBounty dashboard. The page is headed Bank accounts and lists any accounts you have already saved. Click Add bank account to open the account drawer.
Choose your bank from the Bank dropdown. The list contains supported Nigerian banks.
Enter your account number in the Account number field.
Click Verify account. For Nigerian stores, StoreBounty performs an account lookup and populates the Account name field automatically. Check that the returned name matches the account you intend to use. This verification step is shown for Nigerian stores; stores in other countries may see a different flow.
Toggle on Primary bank account if this is the account you want ConfirmTransfer to use. ConfirmTransfer selects the account marked primary; if no primary is set, it falls back to the first saved account. If you have multiple accounts, marking the correct one primary avoids any ambiguity.
Click Add account to save. Click Cancel if you need to start over.
Once the account is saved, you are ready to configure the checkout behaviour. Keep this page in mind — if you ever change your receiving account later, you will need to return here and update the primary account before the change takes effect at checkout.
Step 2 — Enable ConfirmTransfer at Checkout
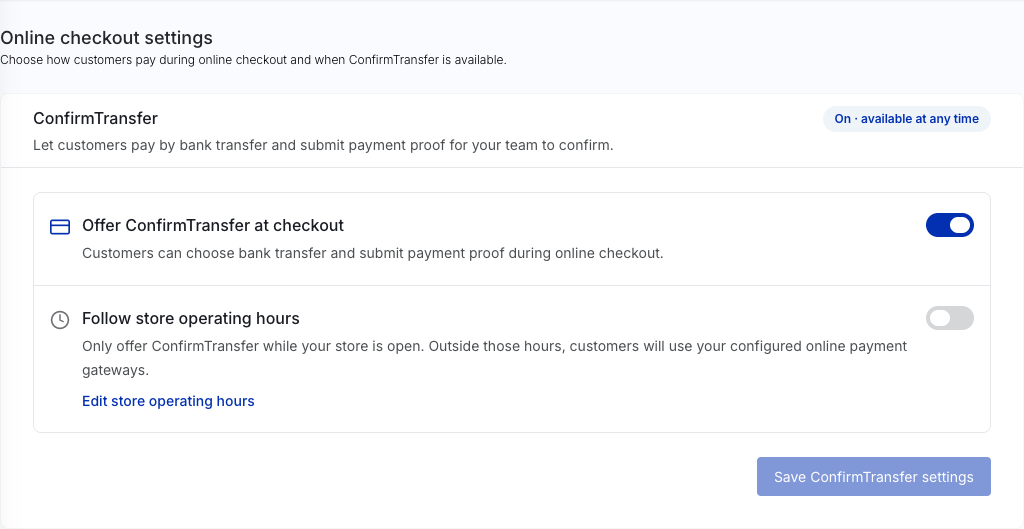
With a bank account saved, go to Online Checkout > Checkout Settings. The page is headed Online checkout settings and contains a ConfirmTransfer card with two switches and a save button.
Turn on the Offer ConfirmTransfer at checkout switch. This is the master control. When it is on, customers will see the bank-transfer option at checkout. When it is off, customers are directed to whichever online payment gateways you have configured — note that those gateways need to be set up separately to work.
The second switch, Follow store operating hours, is independent. You do not have to turn it on. Leave it off for now if you want ConfirmTransfer available around the clock. We will cover it in detail in Steps 3 and 4.
Click Save ConfirmTransfer settings once you are happy with the switches on this card. This save applies only to the ConfirmTransfer card — it does not affect your operating hours schedule, which has its own save button.
If you only want ConfirmTransfer available at all times and have no need to restrict it to business hours, you are essentially done with the checkout settings after this step. Steps 3 and 4 below are only needed if you want to control when the option appears.
Step 3 — Optionally Follow Store Operating Hours
Some stores only want to accept bank-transfer payments during staffed hours, so that someone is available to check the bank and confirm orders promptly. The Follow store operating hours switch makes ConfirmTransfer available only within the periods you define. Outside those periods, customers will be offered your configured online payment gateways instead.
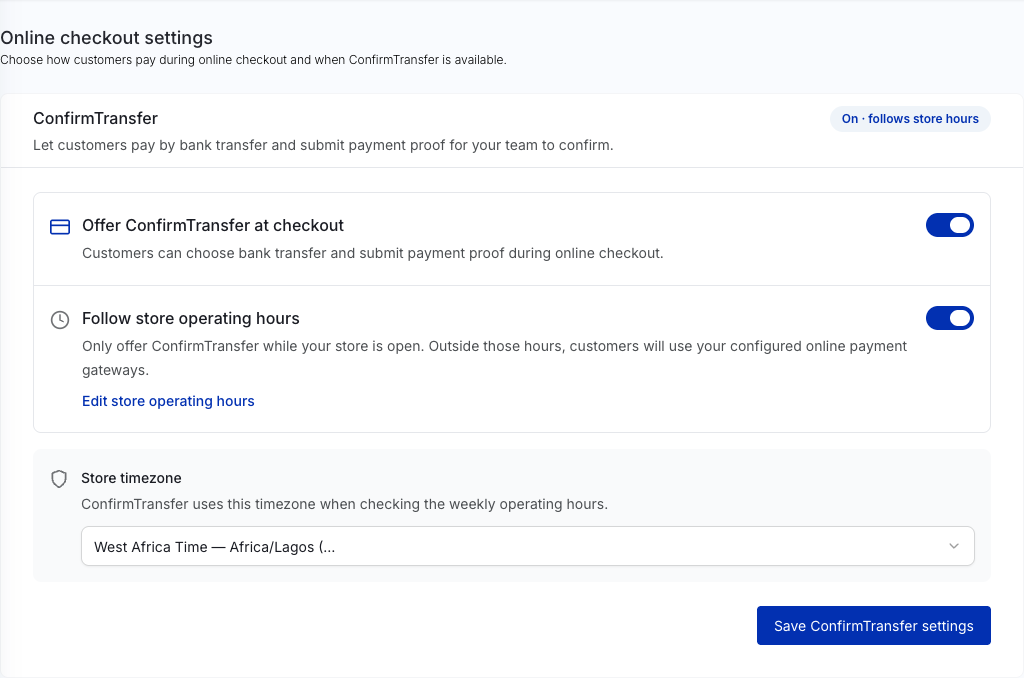
To enable this behaviour, return to Online Checkout > Checkout Settings and turn on the Follow store operating hours switch. When you do, a Store timezone selector appears on the page. This is important: StoreBounty needs to know your local timezone to correctly interpret the opening and closing times you will enter in Step 4.
Select your timezone from the dropdown. For Nigerian stores, choose West Africa Time — Africa/Lagos. If your store operates from a different country, select the timezone that matches your actual location. Using the wrong timezone will cause ConfirmTransfer to appear or disappear at the wrong times for your customers.
After selecting the timezone, click Save ConfirmTransfer settings to preserve this choice before moving on to edit the weekly schedule.
Step 4 — Set Your Weekly Operating Hours
Now you need to enter the actual hours for each day of the week. On the Checkout Settings page, click the Edit store operating hours link. This takes you to Settings > Basic Information at the Operating hours section.
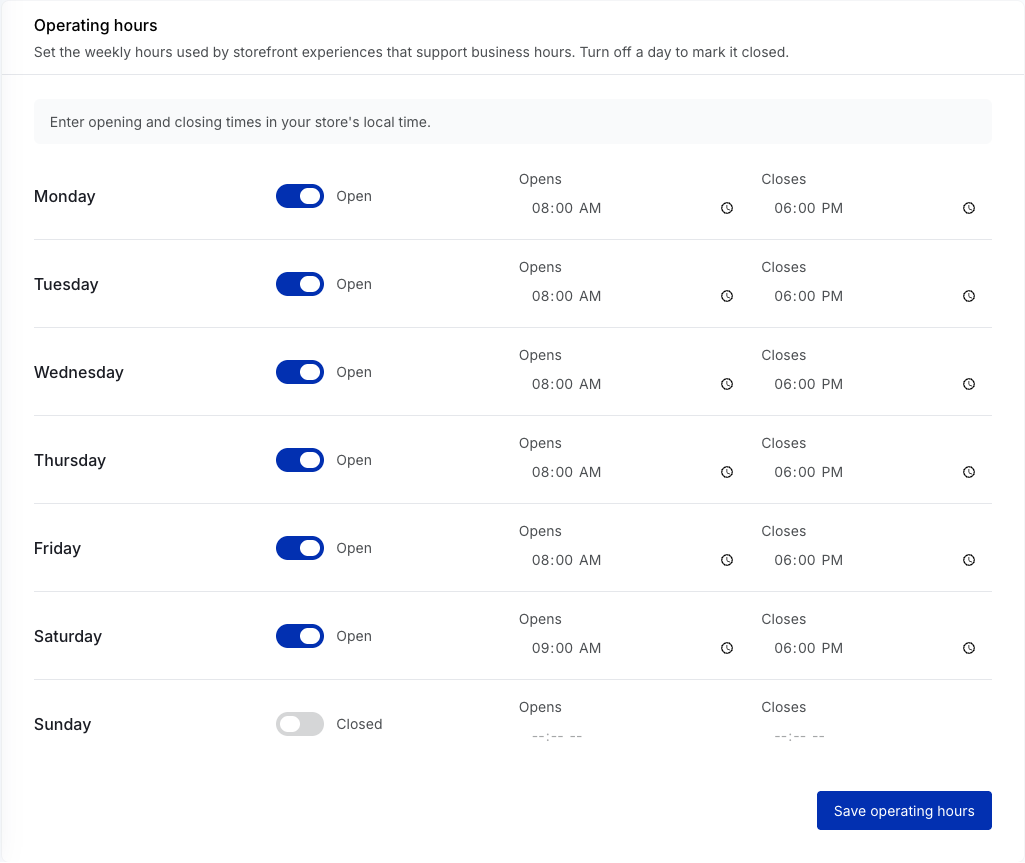
You will see a row for each day of the week, Monday through Sunday. Each row has:
An Open/Closed switch — toggle it off to mark that day as Closed.
Opens and Closes time inputs — enter the times in your store's local time. The closing time must be later than the opening time.
A Realistic Example Schedule
For example, a Lagos-based store might be staffed from Monday to Saturday and closed on Sunday. The schedule below is an illustration, not a required default:
Monday to Friday: Open 08:00 – 18:00
Saturday: Open 09:00 – 18:00
Sunday: Closed (toggle switched off)
With this setup, a customer visiting the store at 20:00 on a Wednesday would not see the ConfirmTransfer option — they would only see the store's configured online gateways. A customer visiting at 10:00 on Thursday would see ConfirmTransfer. Enter the hours that reflect your own actual staffed periods, not this example.
Work through each day row, setting the switch and times as appropriate. When you have finished the full weekly schedule, click Save operating hours. This is a separate save from the Save ConfirmTransfer settings button you used in Step 3 — both saves are required.
If your business operates on a schedule that crosses midnight — for example, 22:00 to 06:00 — the current form requires a closing time that is later than the opening time on the same day. If you need overnight periods, contact StoreBounty support for guidance rather than trying to work around the form.
How the Customer Experience Works
Once everything is saved, it helps to understand what your customers actually see and do — and what that means for your team.
When ConfirmTransfer is available at checkout, customers receive your selected bank account details and transfer instructions. If ConfirmTransfer is disabled or outside the saved operating hours, checkout uses the store’s configured online payment gateways instead. Check that those fallback gateways are configured and working.
After making the transfer, the customer submits payment proof, such as a screenshot of the transfer receipt. A receipt upload asks your team to verify payment; it does not confirm that funds arrived. Check the actual credit in your bank records against the order before treating it as paid.
ConfirmTransfer payment-proof submission does not automatically verify bank credits. Your team must check the actual payment and complete the confirmation. Include pending confirmations in the team’s normal order-review workflow.
Common Setup Mistakes to Avoid
Most problems with ConfirmTransfer come down to a small number of avoidable errors. Here are the ones that come up most often:
No bank account saved. ConfirmTransfer cannot appear at checkout without a saved bank account. If you turn on the main switch but have not completed Step 1, the option will be unavailable. Always add and verify the account first.
Wrong timezone selected. If you select a timezone that does not match your actual location, your operating hours will apply at the wrong times. A store in Lagos using UTC instead of Africa/Lagos, for example, will show or hide ConfirmTransfer an hour off from their intended schedule.
Forgetting to save operating hours separately. The weekly schedule has its own Save operating hours button in Settings > Basic Information. Clicking Save ConfirmTransfer settings on the Checkout Settings page does not save your weekly schedule.
Closing time set earlier than or equal to opening time. The form requires the closing time to be later than the opening time on the same day. A row with 09:00 as both opening and closing, or 18:00 opening and 08:00 closing, will not save correctly.
Assuming uploaded proof equals confirmed payment. This is the most consequential mistake. Dispatching goods before verifying the actual bank credit can result in losses. Always check your bank before confirming.
No primary account marked when multiple accounts exist. If you have added more than one bank account and none is marked primary, ConfirmTransfer will fall back to the first saved account. This may not be the account you intend customers to pay into. Mark the correct account as primary to be certain.
Disabling ConfirmTransfer without configured gateways. If you turn off Offer ConfirmTransfer at checkout, customers will be directed to your online payment gateways. If those gateways are not set up and working, customers will have no way to pay. Make sure your fallback payment options are in order.
Final Verification Checklist
Before you go live, run through each of the following points. Every item should be confirmed before you start taking real orders through ConfirmTransfer.
Bank account saved and verified. Go to Settings > Bank Accounts and confirm that your receiving account appears in the list with the correct account name.
Primary account correctly marked. If you have more than one account, confirm that the intended one is set as primary.
Offer ConfirmTransfer at checkout is on and saved. Check Online Checkout > Checkout Settings and confirm the switch is enabled and you have clicked Save ConfirmTransfer settings.
If using operating hours: Follow store operating hours is on, timezone is correct, and Save ConfirmTransfer settings has been clicked.
If using operating hours: weekly schedule is complete and Save operating hours has been clicked. Confirm that each open day has a valid opening and closing time, and that closed days are toggled off.
Storefront checkout tested during an open period. Visit your actual storefront, add a product to the cart, and proceed to checkout. Confirm that the bank-transfer option appears and shows the correct bank account details.
Team briefed on payment verification process. Everyone who handles orders knows to check the bank statement before confirming any transfer-based order.
Your Next Practical Step
Start with the receiving bank account, then work through the checkout switch and optional hours settings. Save the settings on each page and inspect your storefront checkout to confirm the correct bank details appear during an available period. Make sure the team knows who will review payment proof. A configuration check does not require sending money; handle any later controlled transaction as a real sale under your store’s normal procedures.